African violets were the first plants I ever made back in 1978. Even though I can make other kinds of them now, I really don't want to. They are not as realistic, but they really look good sitting on a table in a parlor or among other plants on a potting bench in a green house or conservatory.
Here are the steps that I use:
Not quite sure what I want to do next. We'll see!

Here are the steps that I use:
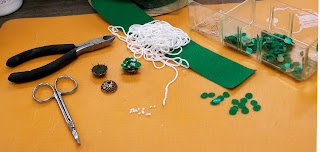
- Punch ground circles out of flocked green ribbon. It is fairly easy to find everywhere at Christmas time.
- The flowers are made out of bunka. It is not as common, but inexpensive and easy to get online or from many miniature dealers. Nothing else works as well for this and quite a few other projects in miniatures. Pick your color. Stretch the bunka and snip off little pieces.
- Pick whatever you want to use for a pot and prepare it for planting.
- Cut small pieces of wire, glue one end and stick into the pot at angles that set up the shape of the final plant. You pick the shape. Let it dry.
- Put some thicker glue on part of the back of the ribbon circles. Place them overhanging the edges of the pot to start, then gradually work inward in a spiral putting the circles at various angles attached the wires. Use the wires to build up a little height, but hide the wires as you go. It will make sense as you do it but it is hard to explain. Look at a real African violet or at least a picture of one while you are working on this step and it will be easy.
- After the leaves have dried, dip the tiny pieces of bunka lightly in thin glue and place on the leaves where you want the flowers. Remember African violet flowers come in clusters. You want some in the center and anywhere else that you would want flowers. If any wires are still showing, put some bunka on it. The older the plant, the more flower clusters you will have. Sometimes I will put a taller wire or two in the center to raise a flower cluster above the leaves (just don't go too tall!).
Not quite sure what I want to do next. We'll see!
Comments
Post a Comment